Putting
It All Together
Exporting data from reports
in ESC
You’ve
had a brutal week. It seems that everything
that could go wrong did. You have been working
12 hours a day and the manager of the local
McDonald’s just gave you a frequent
diner’s discount. This morning you
walked into the office to find out that
your bookkeeper quit and left the state
due to some unfortunate incident involving
the county sheriff. To make matters worse
your fax machine seems to only want to dial
a horoscope hotline that charges $4.95 a
minute and your accountant just reminded
you she needs your sales tax information
across town by 3:30pm today in order to
meet the deadline. It is now 3:00pm.
Before
you engage in a little primal scream therapy,
think for a moment. Don’t you remember
your salesperson saying something about
the ability to email reports directly out
of your Electronic Service Control software?
Sure you do. Can’t remember how? Pick
your head up off the desk and pour yourself
a strong cup of coffee. Then take a deep
breath and read on and it will all come
back to you. Hurry though, the clock is
ticking.
To
get this information to your accountant
on time we have to do two things: create
and preview the report we want to send,
and choose the program we want to use to
view the data that is sent.
In
this case your accountant needs the Sales
Tax report in a Microsoft Word format. The
first step in this process is selecting
the report criteria. Click on your Sales
pull-down menu and select Reports.
Choose Sales Reports from
the fly-out menu to display the following
screen.
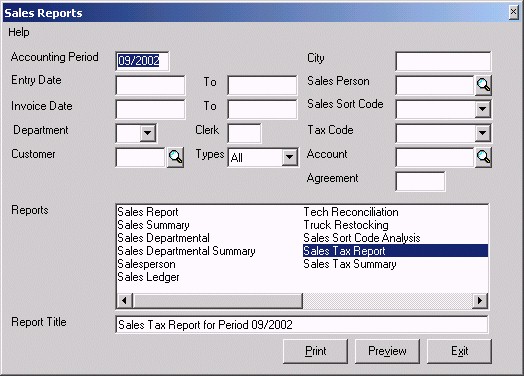
Now
select the information you want to see on
the report. To keep things simple, use the
default options shown in the previous screen
shot. This will give us a Sales Tax report
for September, 2002. Select Sales
Tax Report and click the Preview
button.
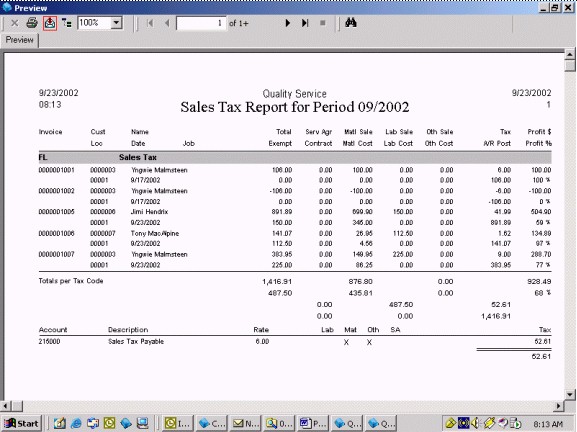
At
this point we can review our report and
verify it reflects the information we want
to send. Once verified, click on the envelope
icon outlined in red on the picture above.
This
will display the following window which
will allow us to select our exporting options.
Click the down arrow in the Format
field to choose the program you will use
to view the data later. Since your accountant
wants this information in a Microsoft Word
format, select Word for Windows
Document.
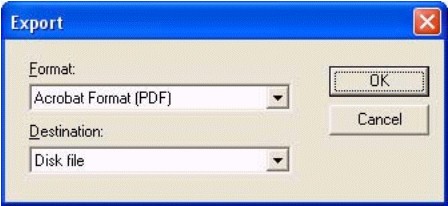
Next,
click on the down arrow in the Destination
field to select what we want to do with
the data we are exporting. This should give
you the following options:
Select
the Microsoft Mail (MAPI) option;
then click OK. This will
display an Export Options
window. The selections you made on the Export
screen will determine the options displayed
on this screen. Usually with a little bit
of trial and error you can find some settings
on this screen that will work well for you.
In this case we have it easy. All we have
to choose from is if we want all of the
report exported or just the part within
a certain page range. Select ALL
and click OK.
If
you have a MAPI compliant mail program such
as Outlook, Outlook Express or Eudora, you
will now see a blank message with your data
attached in a Word format. Simply fill out
who you want to send it to and add a subject
and body text if desired and off it goes.
If
you don’t have a MAPI compliant
mail program, such as America Online v6.0
or earlier, all is not lost. Instead of
selecting the Microsoft Mail (MAPI) destination,
simply select Disk File
in its place. This will write the file to
the disk in the location you specify. You
can then fire up your preferred mail client,
attach the newly created file and send it
that way.
Mission
accomplished! Now go home and give your
family a big hug. Life will get better and
you can always count on your Electronic
Service Control software to help you when
you need it.
Once
you get the office running like a Swiss
watch again, go back and set the Destination
field to Application and
try out some of the other Formats.
See if you can export your Price Book into
Word or your Sales Reports into Excel. Once
you get them there you can modify them any
way you like. Rearrange columns, change
fonts, or combine information from other
reports. The sky is the limit. Give it a
shot. You may find other combinations that
will help simplify your work day.